A project revealed

fuzion2

Don’t you love it when you reach the end of a project, or in this case the end of the first part. It seems like yesterday but in reality it was a few weeks ago I set out to make this bag as it says in the best arty press releases ” a fusion of contrasting materials”. Another way to look at it is a way of using up some off cuts.

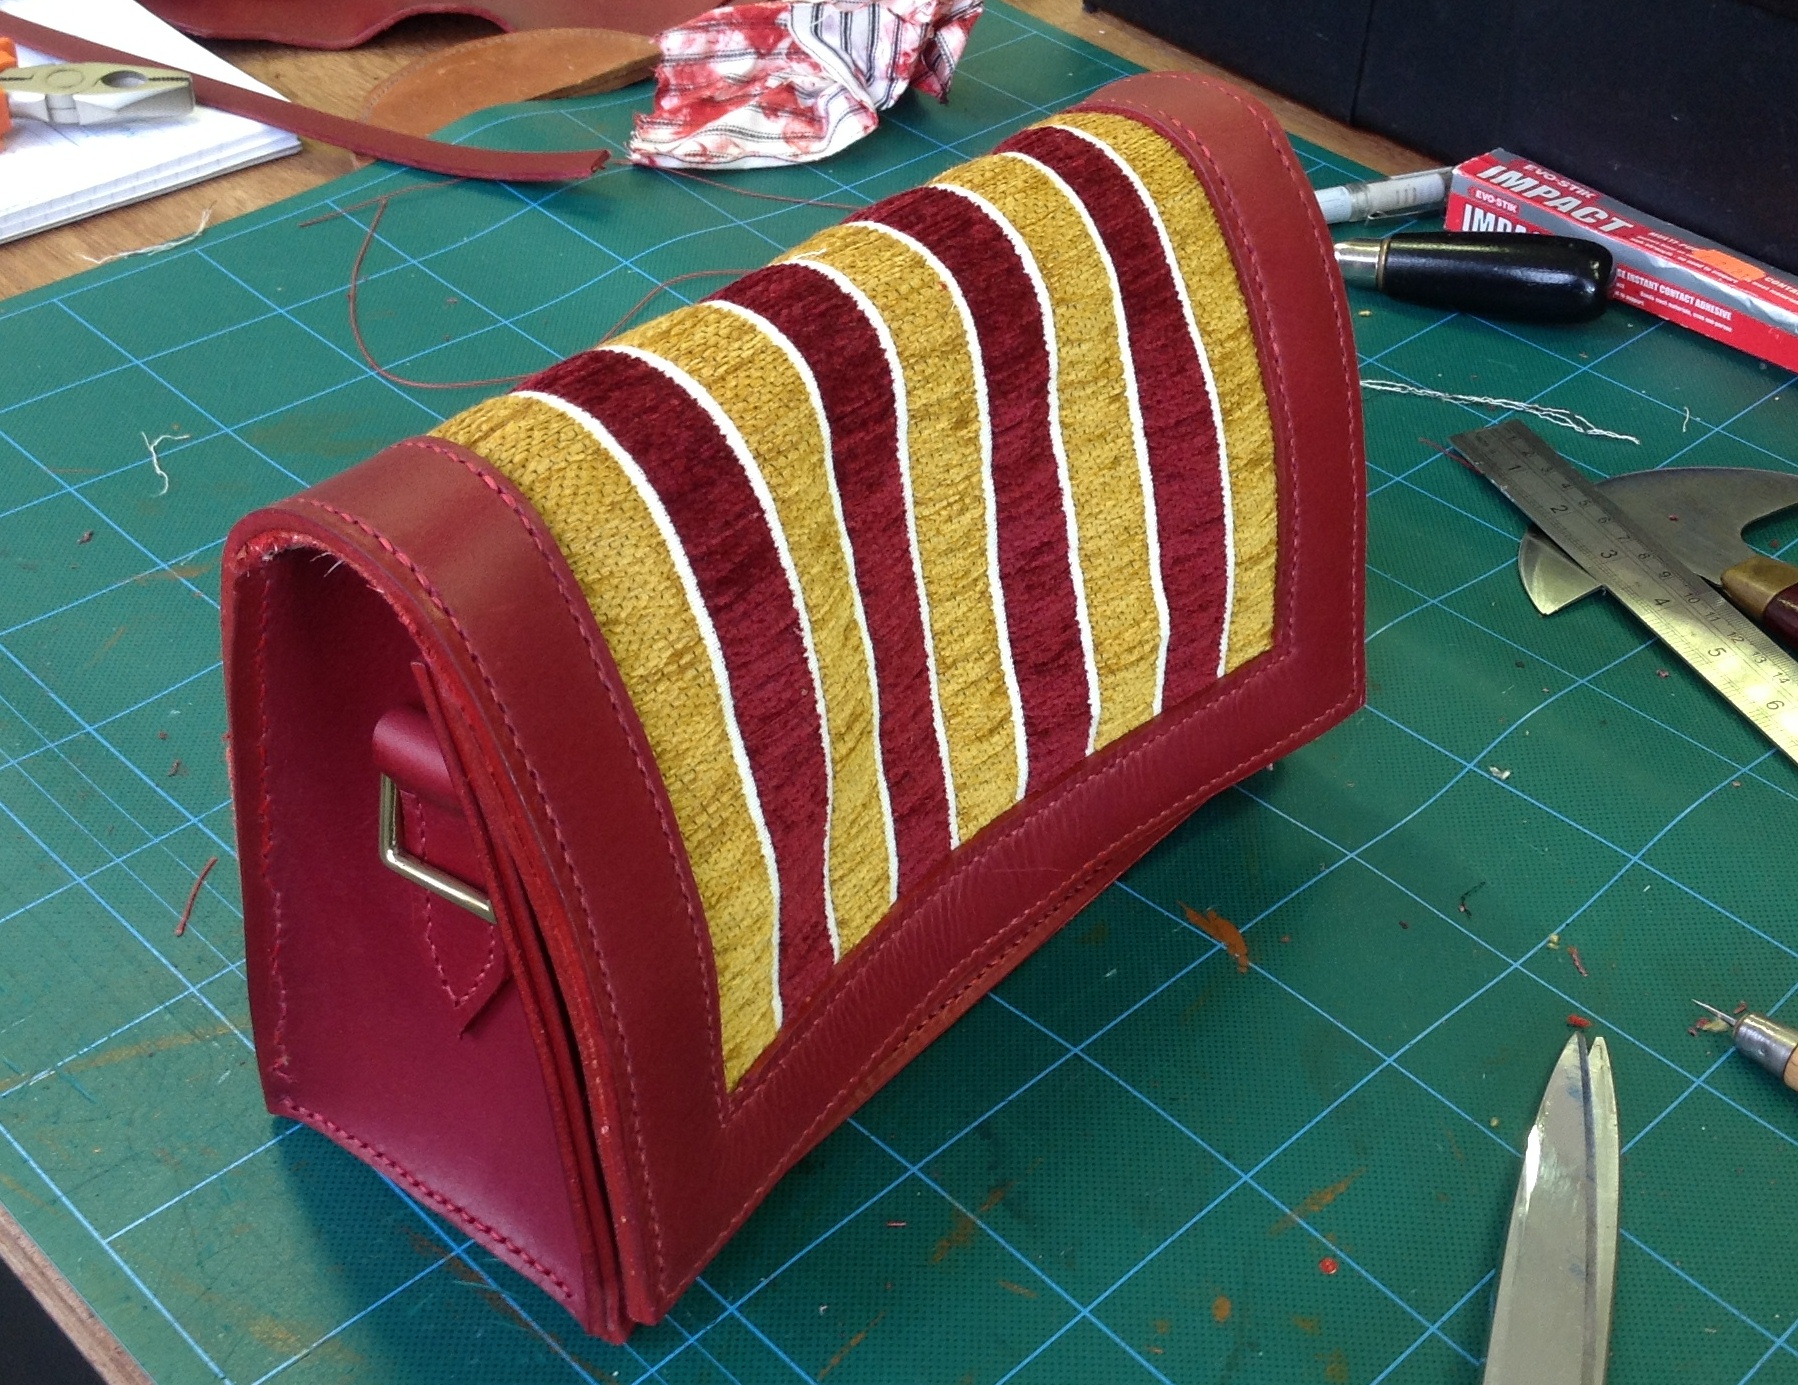
For sometime I have been thinking about mixing together Upholstery Material with Leather to create a bag. Starting small I set out to make a handbag and as the pictures shows I managed it. For a first attempt without any references to guide me from it works to a point, however if I ever made another I would do it slightly differently.

Its been an interesting project. Leather is a lovely material to work with, stable, doesn’t fray, its stiff and retains a shape. Fabric is quite the reverse. I frequently work with both materials separately but this is the first time together, and it came with a number of issues. Normally when your stitching leather you hold the pieces together in a clamp, that didn’t work with fabric, so sewing the parts together was like juggling jelly fish and it shows. Not my neatest sewing, but occasionally it does you good to push the boundaries. Just to complicate the issue once I started I realised I needed to line the back of the fabric. Another first a lined bag.

Throughout the process its always interesting to see the reaction from visitors to my workshop, for this project its been mixed, one particular visitor hated it at the start, and now wants one, some loved it from the start, others continue to dislike it. Any comments or design tips always welcome

Now its just the handle to make. I have been inspired by a book on leather whip braiding.I have braided a few whips in the past so I understand the technique but have never tried making a braided shoulder strap before, so I might as well continue the experimental theme and see what happens.

Thanks for reading

Tom

Posted in craft, Leather work | Tagged , , , , , , , | 1 Comment

A good nights sleep

 I have been building a showman’s wagon for a few years now, in between paying projects, starting with a plank of wood and some steel, to what is now a recognisable wagon the only piece I have brought were the springs. A showman’s wagon as the name suggests is the fairground owners living wagon. In Victorian England the wagon was seen as the outward manifestation of the owners wealth and standing, and as a consequence rose to great heights of luxury with cut glass windows, marble fireplaces and separate sleeping area,   Now whilst mine isn’t going to reach those dizzy heights it will feature an integral toilet and shower cubicle, along with a solar panel on the roof, so a modicum of comfort and I hope a real home from home. Its my plan when I retire, to take a trip with my wife,pottering along through the highways and byways in my showman’s wagon towed by a vintage tractor or if I am really lucky a horse. I suspect the biggest problem will be that I have been looking forward to retiring since I was 16 and have so many plans and projects for when I retire I wont have time, so I will settle for camping in the garden.

What prompts my post is that my video about how to make a mattress has just passed the 10,000 views, much to my surprise. I am constantly amazed by the  number of views and the kind comments.

  In a caravan as you will know if you have ever spent a night in one everything has to be multipurpose, this usually includes the bed which converts into banquette  chairs and table for the day time. I did look to buy a mattress in sections but the cost was eye watering, so with my usual naïve confidence off I went and made it. The video is the result

The end result was surprisingly good, gives a very good nights sleep and can be scaled up to a full size mattress quite easily, you just need a bit of space to work with when your making it. Its made by stitching together upholstery springs into a grid, and then covering with various layers of fabric and wadding. Have a look at the video and see what you think.

Posted in craft, heritage craft | Leave a comment

Perfect Day pt 2

raspberry

My wife accuses me of being a creature of habit, something I strongly deny, and yet find myself making the same things at the same time every year, especially when it comes to jam. Now it happens I do enjoy making jam, every January I make Orange Marmalade, every September its Blackberry and Apple, and every July its Raspberry and Peach Jam. This year I thinking I might give her a surprise as I am planning an extra one for September. I have planted a row of Golden Raspberry’s from which I should get a crop this year, for which I am planning Golden Raspberry jam, or if I get enough I might go as far as Golden Raspberry Cordial. How about that for being spontaneous, though thinking ahead I don’t know how I will top that for Christmas.

Now as part of last Saturdays perfect day I made this years batch of Peach and Raspberry jam. A lovely jam which I have made for several years, perfect for breakfast and sublime with a cream tea, scones, clotted cream and jam. If you have never tried it making jam is very easy, and to start out you don’t need lots of fancy equipment, a pan, a spoon, a cooker, and some empty jars. Most homes can manage that.

For this you will need
1kg of Raspberry’s
1kg of peaches ( or nectarines if you prefer) I managed to get Saturn peaches, the flat ones that look like ring doughnuts
2kg of jam sugar
1 lemon
9 1lb jam jars

Method.

1. Put a small plate in the freezer, and put the clean washed jars into a cold oven,set the temperature to about 80 degrees and let them warm up slowly. this sterilizes the jars

2. Wash and dry the fruit, Put the raspberry’s into a large heavy bottom saucepan, or jam pan if you have one. Chop up the peaches into pieces, add to the pan with the sugar and stir. Beware when the jam boils it comes up the sides of the saucepan so make sure whatever one you use can cope with the mixture expanding by 2 or 3 times.

3.As you can see from the picture I like a chunky jam with lots of fruit pieces so I cut the peaches up into 6-10mm cubes,and then leave the whole mixture to stand for 12 hours. This firms up the peach pieces so they stay semi whole and chunky. If you don’t like yours this way just put it straight on the heat.

4. Slowly heat up over approx. 20 mins, don’t be in a rush, just enjoy the aroma and anticipation, resisting the temptation to stir too much. Add in the juice of one lemon and bring to what is known as a rolling boil. You will know it when you see it and continue to boil for 5 minutes, and then reduce the heat.

5. Retrieve your now very cold plate from the freezer. dab a little of the mixture on the plate and leave it to set for a short while. It will cool rapidly and you can see if the mixture will set by pushing it with your finger,it should start to wrinkle, if it doesn’t boil it some more and try again. Plan B is the scientific method, use a cooking thermometer and when the mixture reaches 105c (220F) its reached setting point. Plan B is probably better but not so much fun, and you don’t get to lick the plate.

6.When your satisfied you have reached the correct temperature, remove the pan from the heat and leave it for 10 minutes to cool slightly before spooning into your now warm jars. If you put the mixture into the jars straight away all the chunks of fruit float to the top, so you end up with the just red jam at the bottom of the jar. Whereas if you let it cool slightly, the mixture thickens and the fruit chunks remain distributed throughout. Seal the jars with a lid and its never a bad idea to put on a label.

7. Leave to cool overnight before trying

Posted in craft, food | Tagged , , , , , , , , , , , | Leave a comment

The Perfect Day Part 1

croissants (2)

We all have our own idea of a perfect day, it might be going out to a particular event, meeting someone, or doing something special. I think I have just had that day, I had a day when no one wanted me, no one phoned,no one came to visit, there was nothing I had to do, the weather was changeable, and I woke up really early, so far its not looking good, and I sound really miserable.

In practice what this meant was that we, my wife and I, could do anything we wanted, and I could make anything I wanted, so I did and looking back its no wonder I went to bed on Saturday night exhausted.

I started the day by making croissants for breakfast. Now I have been trying to make these for years and finally I have the recipe just right. If you fancy a go I have put it at the bottom of this missive. Going on from there I had a pleasant mooch with my beloved around Holt in Norfolk a lovely little town with a magnificent food hall where its impossible to escape without spending money. Lunch was home made bread, Then I made this years supply of my favourite Jam – ideal for cream teas, closely followed by a batch of Brandy and Cinnamon Ice Cream. If anyone’s interested I will put the recipes for these up over the next few days.

Dinner was hot Smoked Chicken cooked in the smoker , with potatoes, courgettes, onions and tomatoes from the garden,  and whilst it was cooking I just had time to cut the stripes in the grass – its a blokes thing. Dinner was washed down with a Glass of Adnams Ale.

 In my world that’s about as good a day as it gets.

Toms Croissant Recipe

250 grams Plain Flour

30 grams caster sugar

0.5 teaspoon of salt

180 grams salted butter

6 grams dry active yeast

60 grams full fat milk at room temperature

Method.

1.Put the yeast into 60 grams of tepid water and put to one side for approx. 10 mins until a foam appears on the top.

2.Combine the flour, sugar, and salt into a mixing bowl and rub in 30 grams of the butter until it resembles fine bread crumbs. Add the water / yeast mixture. If your mixer has a dough hook your life is easy use that, if you haven’t got one combine it all with a spoon slowly adding the milk until it becomes a dough. Take it out and knead it on a floured surface for a few minutes, then cover it with plastic wrap and put in the fridge for 20 mins.

3. Cut a piece of plastic wrap 45cms in length and put the 150 grams of butter in the middle. Fold both ends over to make a very loose envelope containing the butter. Tap it with your rolling pin slowly forcing it out to make what I can best describe as a plate of butter 150mm x 100mm approx. 6mm thick.

4. Retrieve the dough and roll out to approx. 300-400 mm x 200mm x 6 mm thick. Put the butter into the centre and fold the top half of the dough over to cover the butter, and then fold the lower half over to cover the top. Turn the whole butter/dough construction around 90 degrees and roll until its about 300mm long. Fold the top third down across the middle third, and then the bottom third up to cover it all. Cover with plastic wrap and refrigerate for 30 mins.  Do the turning, rolling and chilling three more times. I then leave the dough in the fridge overnight. Apparently it keeps in the fridge for a week, but who knows, I have never managed to keep any that long.

5.When your ready cut off as much dough as you need and roll it out until its about 6mm thick. If your making standard croissants, and I do have a number of variations, you need triangles about 150mm across the base, which you then roll and bend the ends in slightly to make the standard croissant shape

croissants

cover and leave in a warm place to prove for about 1 hour, and then back in the over 175 degrees (160 in a fan oven) for about 20 mins until there golden brown. Leave them to cool for as long as you can resist. Delicious with butter even better with my raspberry jam.


Hope you enjoy them

Tom


Posted in craft, food | Tagged , , , , , , , , , , | Leave a comment

A work in Progress

fusion I thought I would try something new for my next project and try a fusion of upholstery fabric and leather, so its experiment time, and once again visitors to my workshop are being vocal, I am thinking of getting a secret corner for me to work in.

As its an experiment I am using up some off cuts, the fabric is left over from a Chaise Longue I built a couple of years ago, and the leather is what’s left after the Ladies Briefcase project. The only thing I needed to buy was some lining fabric, so the whole project will cost about £10 including buckles. A bargain if it works.

So what we have is a small Ladies Handbag and the picture shows what will become the main piece of the bag, the panel that forms the back and then up and over to become the flap. Its proving to be interesting mixing the different materials, the leather is quite rigid but the fabric bends all over the place so to holding them together has its moments, and sewing was far more challenging than I thought, so I will think carefully before I try mixing fabrics again, depending upon how it turns out, but that’s life on the cutting edge for you.


Posted in craft, Leather work | Tagged , , , , , , | Leave a comment

Smoking Food The video

Its always interesting to see the progress of a project which is where video comes into its own, but it reminds me how exhausted I was after a day and half being a bricklayer. Im used to physical work but an 8 hour day of shifting bricks and mixing cement wiped me out, and you can tell when it was the end of a day, not looking my best. Still the end result was good and the food was delicous, and next time round its smoked cheese, does life get any better than that.

Hope you enjoy the video

Posted in craft, food, heritage craft | Tagged , , , , , , , , , | Leave a comment

Smoking food – The Magnificent Conclusion

smoke3
Its annoying when the real world and the need to earn a living gets in the way of finishing a project, but finally a weekend clear to finish the food smoker in the garden.

Having constructed a brick box, fitted the door frame, two part steel door needed to control the air flow, and the internal steel frame described in an earlier post it was finally ready.to be tested, albeit in the rain but as someone said 10ft snow drifts wouldn’t have stopped me this weekend. For the inaugural smoke I choose to hot smoke a supermarket Turkey Breast never a classic meal, so it can only get better.

The smoker is designed to be used as either a hot or cold smoker. The difference is that with a cold smoker you set light to a quantity of wood chippings or sawdust in the bottom, the resulting smoke fills the compartment, and smokes the food. There is no heat as a consequence you can smoke food like cheese, as well as the more usual bacon or fish. I have never had a cold smoker before and this was definitely one of the driving forces behind the project, a desire for smoked brie.

Having got you salivating lets return to the job in hand, for the first time I was going to use this as a hot smoker, something I have a some experience of. As you will see from the photos inside the brick compartment I have constructed a steel rack with several shelves. The top couple were the most expensive part of the whole project a pair of Barbeque grills plates, which take the food. At the bottom is a steel pan in which is a Charcoal fire, a combination of commercial charcoal and my charcoal. (if you haven’t already seen it the making charcoal video explains https://www.youtube.com/watch?v=TH6RrY8oWd4) This imparts a smoky flavour onto which I then add some damp wood chips which is what really makes the smoke, and you can argue for days over what wood to use. The final part is the middle section which is the secret weapon of the whole hot smoking system. This consists of a 3mm thick steel shelf on which is a pan of water which gets heated by the fire. The heat from the fire and the smoke it produces cooks the food, and its the water that keeps the smoked food from drying out.

For the first time, as it was a test we only had once piece of meat in there our supermarket turkey breast, which isn’t the most economical way to cook, but as you can see you could get quite a lot of food on the shelves and you could have more shelves. I cant help thinking that if you could do a portable version, which wouldn’t be that difficult, you would be a hit at a food market, so dear reader should you decide to try and then make a fortune remember where you got the idea from. To smoke our turkey breast took about 2 1/2 hours, the end result was a delicately flavoured, smoked, succulently moist piece of meat, far better than the original ingredient suggested, which when coupled with Home grown lettuce and new potatoes made a magnificent meal “fit for a king” so next time royalty is passing this is what they can have, though frankly its too good to share even with a passing prince. In the meantime I have a video to edit, and then I’m off to France to buy some brie that needs smoking.

Bon appetite
tom1

Posted in craft, food | Tagged , , , , , | Leave a comment

Ladies Evening Bag

I am delighted to say that the video for the Ladies Evening bag is now available

I have been somewhat surprised by the strength of feeling around this bag. It may well be I had number of visitors at the stage when the bag was finished and before the strap had been fitted, but a number of ladies have expressed quite strong opinions about the location or even need for a strap. If you would like to join in feel free.

In the meantime I shall move on to the next project. I went to the Market at the weekend and came across some really nice upholstery fabric, so its time for a change and a move away from leather for a time


Posted in craft, heritage craft, Leather work | Tagged , , , , , , , , , , , , | Leave a comment

“Everyones a Critic”

evening bag

My latest project which I have just finished is a hand sewn leather ladies evening bag made from Black Patent Leather, with a Red Leather Motif on the front. This was one of those middle of the night good ideas when I couldn’t sleep, and was an experiment, There isn’t a customer, although several ladies have subsequently  kindly offered to look after it for me.

Pretty much all the bags I have made for the last couple of years are fairly robust. Their day time bags. I like to think they will last and as a consequence the closing mechanism is a short strap and a buckle, which does the job a treat and you would have to try hard  to break, but don’t take that as a challenge.

However I was sent to try some magnetic catches, quite elegant but with a downside. They fasten to the leather with two little prongs that push through and bend over which is a bit unsightly on the front of a bag, therefore you need to have something over the top to mask them. Hence the three feather design on the front, which now I have pointed out obviously you can see.  As any man, desperate to buy a present for his loved one at Christmas, will tell you black and red are a classic combination worn by every sophisticated lady, and as luck would have it I had some red leather left over.

The bag itself is fairly straightforward and non controversial, if I did it again I think I could improve upon the design on the front, and probably the colour scheme. When I edit the video in a few days have a look and see what you think. However a battle has raged over the strap. I do get a few visitors to my workshop and most of the time I receive nice, kind, and polite comments, no one questions the design. But for some reason this bag has caused arguments.

One school of thought says it doesn’t need a strap, keep it as a clutch bag. Another point of view is a short handle, a variation on that is a wrist strap. I made it with a shoulder strap with the lugs on the back of the bag, however another lady favoured the lugs at the ends. All very firmly held, and frequently expressed opinions. I just thought I was having an experiment not starting a war.

If you have any thought feel free to join in.

Tom

Posted in craft, Leather work | Tagged , , , , , , , | Leave a comment

70,000 people cant be wrong

A Milestone has been reached.

For the first time I have a video with 70,000 views.

When I started posting videos such figures were completely outside of my comprehension, the work that I do is a very niche area, to my mind no one would be interested. To my delight I found that they were, and to my amazement they continue to be interested.Now just over a year later 70,000 have seen this one video, and the comments have been very kind.

This was a bag I was asked to make as a present for a young lady going off to university, big enough to take a lap top, and books – remember them, as she travels between lectures. She chose the tan leather, and asked for yellow stitching to my dismay, but what can I say, The customer is always right.  I was particularly pleased with the end result, and I saw the young lady in question with her bag recently and it still looks good despite a year of student life.

Subsequently I was asked by a viewer to make another video with the same size bag but turned sideways and made into a backpack, which I did.

Posted in Leather work | Tagged , , , , , , , | 4 Comments